How to Style an Elegant Fruit Tray
- Laura Galloway
- Apr 7, 2022
- 5 min read
Updated: Apr 28, 2023
There aren’t many fruits I don’t love, and it would be difficult for me to narrow down to a favorite; although, eating fresh mango in Honduras or an Açaí bowl in Brazil made from the berries right in front of me are two experiences I’d love to many times again.
When my brother and I were little, during our summers, my mom and grandparents would split a watermelon in half and set it on a couple of plates for my brother and me. We’d sit at the picnic table with our hands behind our backs and go face first into the watermelon to see who could finish theirs first. I can still remember sitting there, covered in juice from the melon with a huge smile on my face. We sure did have the best time! Now that I’m pushing 33, you’d probably think it wouldn’t be appropriate to eat a watermelon this way, but I’m thinking I’m going to have to introduce the kids to a watermelon eating contest this summer and show them how it’s done!!
The details:
A few months ago, I was asked to bring fruit to the lunch my husband’s family had to celebrate his grandmother’s 101st birthday. She’ll be 102 this October, still living at home and is truly one amazing lady! I love a good fruit salad, but I wanted to add a little more style to the tray than just tossing it in a bowl and calling it done; although, there is nothing wrong with that method either because it’ll be eaten and enjoyed by all just the same. But, 101 is a very special birthday, and I wanted to bring something special for my husband's grandmother. For those of you who may be a little extra like me, and for those of you who want to add a little wow factor to your fruit trays, I have some tips that’ll help you turn your next fruit platter into a work of art.

1. Make the tray the day you plan to serve it:
Cut fruit doesn’t last long, so you want to make the tray the same day as your event. A fruit salad would be ok if left overnight in the refrigerator, especially if you add a little lemon juice, but with a decorative tray, it’s best to plan ahead for a little extra time and make your tray as soon as possible before serving. AND speaking of lemon juice, there’s just a few fruits that don’t do well on decorative trays—even if you add lemon juice, so I’d skip on the apples, pears and bananas if you’re going for a fresh presentation. Not that I don’t love all three—I do! There’s nothing more comforting than a peanut butter and banana sandwich with just a little bit of honey, but bananas brown very quickly after being cut (and so do apples & pears), so it’s best to either use them whole with their peels still on, or skip them for your decorative fruit trays.
2. Organize:
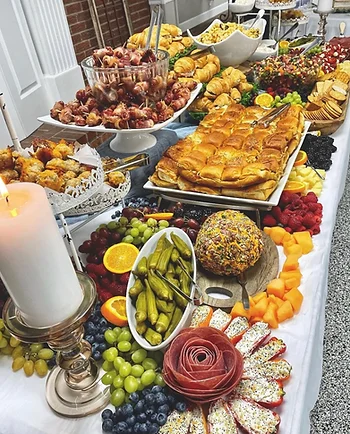
I like to think of what I do as organized chaos. For example, on the tray in the picture above, I intentionally placed the orange and kiwi slices on the outside edges of the tray to create a bold border, and then I mixed the berries and grapes in the center of the tray.
See...organization + chaos!
In the video posted below, I cut the same number of yellow kiwi into a “checkerboard” style as I did the green kiwi. I did the same with my kiwi flowers, filled in with both yellow and green kiwi slices and then finished the board with the same number of orange flowers. There’s “chaos” in the sense that I placed the fruit randomly, but there's organization involved with how I cut the fruit and with the colors I used.
3. Go seedless:
This tip is soo very important, and following it makes everything much more enjoyable for your guests-- not to mention, it is just easier to eat a bunch of fruit when you're not having to worry about secretly spitting the seeds into a napkin. If you’re using watermelon or grapes, purchase seedless. This rule is kind of like the English language (“i before e except after c”) because there are exceptions. Obviously, there are some fruits with edible seeds that are fine left alone: strawberries and kiwi, for example, and then there are cherries, a pitted fruit, and it is totally acceptable to use them whole on a decorative fruit tray. Cherry pits are easy to work around, and they look BEAUTIFUL on a tray, so it would be fine to leave serve them in their natural state.
Just think about your own comfort when selecting fruits. If you'd have a hard time working around seeds of a certain fruit, so will your guests so play it safe and stick with seedless!
4. Planning for a crowd?
The only bad thing that could happen with a fruit tray is running out of fruit to serve, and nobody wants that! So, I’ve put together a little guide to help you know how much fruit to serve for a crowd. For an event where guests are eating lighter, like at a tea or a reception, plan for 1/2 cup of fruit per person. For larger events where guests are expecting to eat a full meal, you can use the following guide to help you plan.
5 guests: 4 cups
10 guests: 9 cups
25 guests: 22 cups
35 guests: 30 cups
50 guests: 40 cups
5. Cutting techniques:
Have you ever seen a beautiful charcuterie board or graze table presented with fruits that are cut beautifully and think to yourself that it looks waaayy to complicated to duplicate? Well, I’ve got GREAT news for you because those beautiful cuts aren’t complicated at all! You just need a super sharp knife and a couple “tricks of the wrists,” and you’ll be cutting like the pros in no time! Here’s a short video I made to help you get started.
6. Get creative:
Truly, it would be very difficult to mess up a fruit tray, so use your imagination and see what you can do! I've seen beautiful trays that included edible flowers, and I've seen pineapple cut into little stars for a patriotic board. Toss a few pomegranate seeds on top for an extra pop of color, or add some fruit dip for a little extra sweetness. Most importantly, have fun because whatever you create will be absolutely beautiful. I’d love to hear all about your experience in the comments below, and if you have a photo to share, we sure would love to see it!


